Related Post: Securing Ghost Blog: My Personal Strategy
Introduction
Managing authentication for multiple services can be daunting, especially when juggling different passwords, security policies, and user management systems. This guide focuses on implementing Authentik as your Single Sign-On (SSO) solution, providing a centralized, secure, and user-friendly way to handle authentication. Whether you’re running a personal blog, a small business, or an enterprise application, Authentik simplifies authentication while enhancing security.
In this post, I’ll share why I chose Authentik, how I set it up, and practical steps to secure your web services effectively. By the end of this guide, you’ll have a robust SSO system tailored to your needs.
What Problem Are We Solving?
Managing authentication for multiple services can quickly become chaotic:
- Multiple Credentials: Each service requires its own username and password.
- Inconsistent Security Policies: Some services may enforce password strength or MFA, while others do not.
- Increased Security Risks: Password reuse across services can expose all accounts if one is compromised.
- Complex User Management: Revoking access for an employee or user requires individual action for each service.
These challenges increase administrative overhead and expose you to potential security risks.
Authentik addresses these challenges by providing a centralized authentication system that's both powerful and user-friendly.
What is Single Sign-On (SSO)?
Before diving into Authentik, let's understand what SSO is and why it matters.
The Problem: Password Chaos
Imagine you're using multiple services, without SSO, you need separate usernames and passwords for each service. That means:
- Managing multiple passwords
- Remembering which password goes where
- Updating passwords individually
- Different security policies per service
How SSO Works
SSO acts as a universal key. With one set of credentials, you gain access to multiple services securely. For example:
- You log in to the SSO platform (e.g., Authentik).
- The SSO platform authenticates you.
- You’re granted access to connected services without needing to log in again.
Think of SSO like a hotel key card. One card (your login) gives you access to your room, the gym, the parking lot, and other hotel facilities. You don't need separate keys for each door.
Now that we understand SSO, let's look at why I chose Authentik to implement it.
Background on Authentik
What is Authentik?
Authentik is an open-source Identity Provider and Single Sign-On solution built with a strong focus on security. It lets you manage user access across multiple applications through a single login system.
Authentik can be integrated into existing systems without major restructuring and provides comprehensive user management features, including password resets and profile controls.
Key Features
Authentik's feature set is comprehensive without being overwhelming:
- Multiple Authentication Protocols: Supports OAuth2, SAML, LDAP, and OpenID Connect, ensuring compatibility with most services.
- Custom Authentication Flows: Build flows that adapt to your needs (e.g., MFA only for admin users).
- Granular Access Control: Use attributes like user roles, IP address, or time of day to enforce policies.
Why I Chose Authentik
When setting up authentication for my services, I looked at several options: Authentik, Authelia, Keycloak, and commercial solutions like Okta. Here's my simplified breakdown:
| Solution | Pros | Cons |
|---|---|---|
| Authentik | Open-source Modern interface Flexible flows Active community |
Learning curve Documentation gaps |
| Authelia | Simple setup Lightweight |
Limited protocol support No SAML |
| Keycloak | Enterprise-ready Comprehensive |
Complex setup Resource heavy |
| Okta/Duo | Full-featured Commercial support |
Expensive Vendor lock-in |
What Made Authentik Stand Out
After evaluating other options like Keycloak, Authelia, and Okta, I found Authentik to be:
- Easier to Set Up: Compared to Keycloak.
- More Flexible: Compared to Authelia.
- Cost-Effective: Free and open-source, unlike Okta.
For my setup, choosing between "too basic" (Authelia) and "too complex" (Keycloak), Authentik was just right.
Setting Up Authentik
Prerequisites
Before diving into Authentik setup, ensure you have:
- A server running Docker and Docker Compose
- Basic understanding of authentication concepts and protocols
- Domain name with DNS access
- Reverse proxy (like Nginx or Traefik) already configured
- SSL certificates for your domain
Installation
For basic installation steps, follow the official Docker Compose guide. However, there's one important tip I learned that can save you from headaches later.
Important: Initial Setup with Public Domain
If you plan to access Authentik from the internet (not just locally), do this before running the initial setup:
- Set up your reverse proxy first (like Nginx or Traefik)
- Configure your domain to point to Authentik
- Access the initial setup through your domain (e.g.,
https://auth.yourdomain.com)
Why this matters:
- During initial setup, Authentik automatically sets its outpost URL
- If you use the default
http://<IP>:9000setup URL, Authentik will use this internal address for outposts - This causes issues later when trying to access Authentik from the internet
- Fixing this after setup requires manual configuration changes
1. Deploy Authentik container
2. Set up reverse proxy and domain
3. Run initial setup through your domain
4. Configure applications
Avoiding the problem:
If you have already set the Authentik via an internal IP, no worries, you can still manually correct the Outpost URL by navigating to https://auth.yourdomain.com/if/admin/#/outpost/outposts and click Edit action. By expanding the Advanced Configuration, you should be able to see authentik_host , change the URL of it to your public domain and the issue should be solved.
This small detail makes a big difference in how smoothly your Authentik deployment will work with external services.
Hardening Authentik
Adding the CAPTCHA Stage
One of the first things I did after setting up Authentik was to add CAPTCHA stage to prevent automated attacks. By placing a CAPTCHA stage between username and password input, we can effectively block bot attacks while keeping the user experience smooth.
Why Adding CAPTCHA?
- Prevents automated login attempts
- Blocks credential stuffing attacks
- Adds security without requiring MFA
- Minimal impact on user experience
Creating the CAPTCHA Stage
In my case, I personally prefer using Cloudflare services most of the time, so I chose Cloudflare Turnstile for the CAPTCHA stage.
To set it up, you’ll first need to obtain a site key and a secret key. Cloudflare provides official documentation to guide you through this process:
After you get those keys, you can navigate to Admin Interface → Flows and Stages → Stage, create a CAPTCHA stage, paste your site key to the Public Key , and paste your secret key to the Private Key.
Interactive option, as Cloudflare Turnstile is an interactive CAPTCHA. Failing to enable this option may result in being blocked from logging in after adding the stage to your authentication flow.Next, you will need to expand the Advanced settings to set up the JS URL and API URL, so that your CAPTCHA can be correctly rendered. According to Cloudflare's official documentation below:
You will need to set
- JS URL:
https://challenges.cloudflare.com/turnstile/v0/api.js - API URL:
https://challenges.cloudflare.com/turnstile/v0/siteverify
Adding the CAPTCHA Stage to the Flow
Now you have finished creating the stage, in order to make it take effect, you need add it to the current flow by following the below steps:
- Go to
Flows & Stages→Flows - Find your authentication flow (usually 'default-authentication-flow')
- Click on
Stage Bindings - Add CAPTCHA stage between identification and password stages:
- Identification Stage (username)
- CAPTCHA Stage (new)
- Password Stage
Now if you log out and log in again, you should be able to see the Cloudflare Turnstile CAPTCHA pops out.
Adding Login Attempt Limits
While CAPTCHA helps prevent automated attacks, we can add an extra layer of security by limiting login attempts. This prevents brute force attacks even if a bot manages to solve the CAPTCHA.
Setting Up Security Policy
- Go to
Admin Interface->Customization->Policies - Configure the below setting:
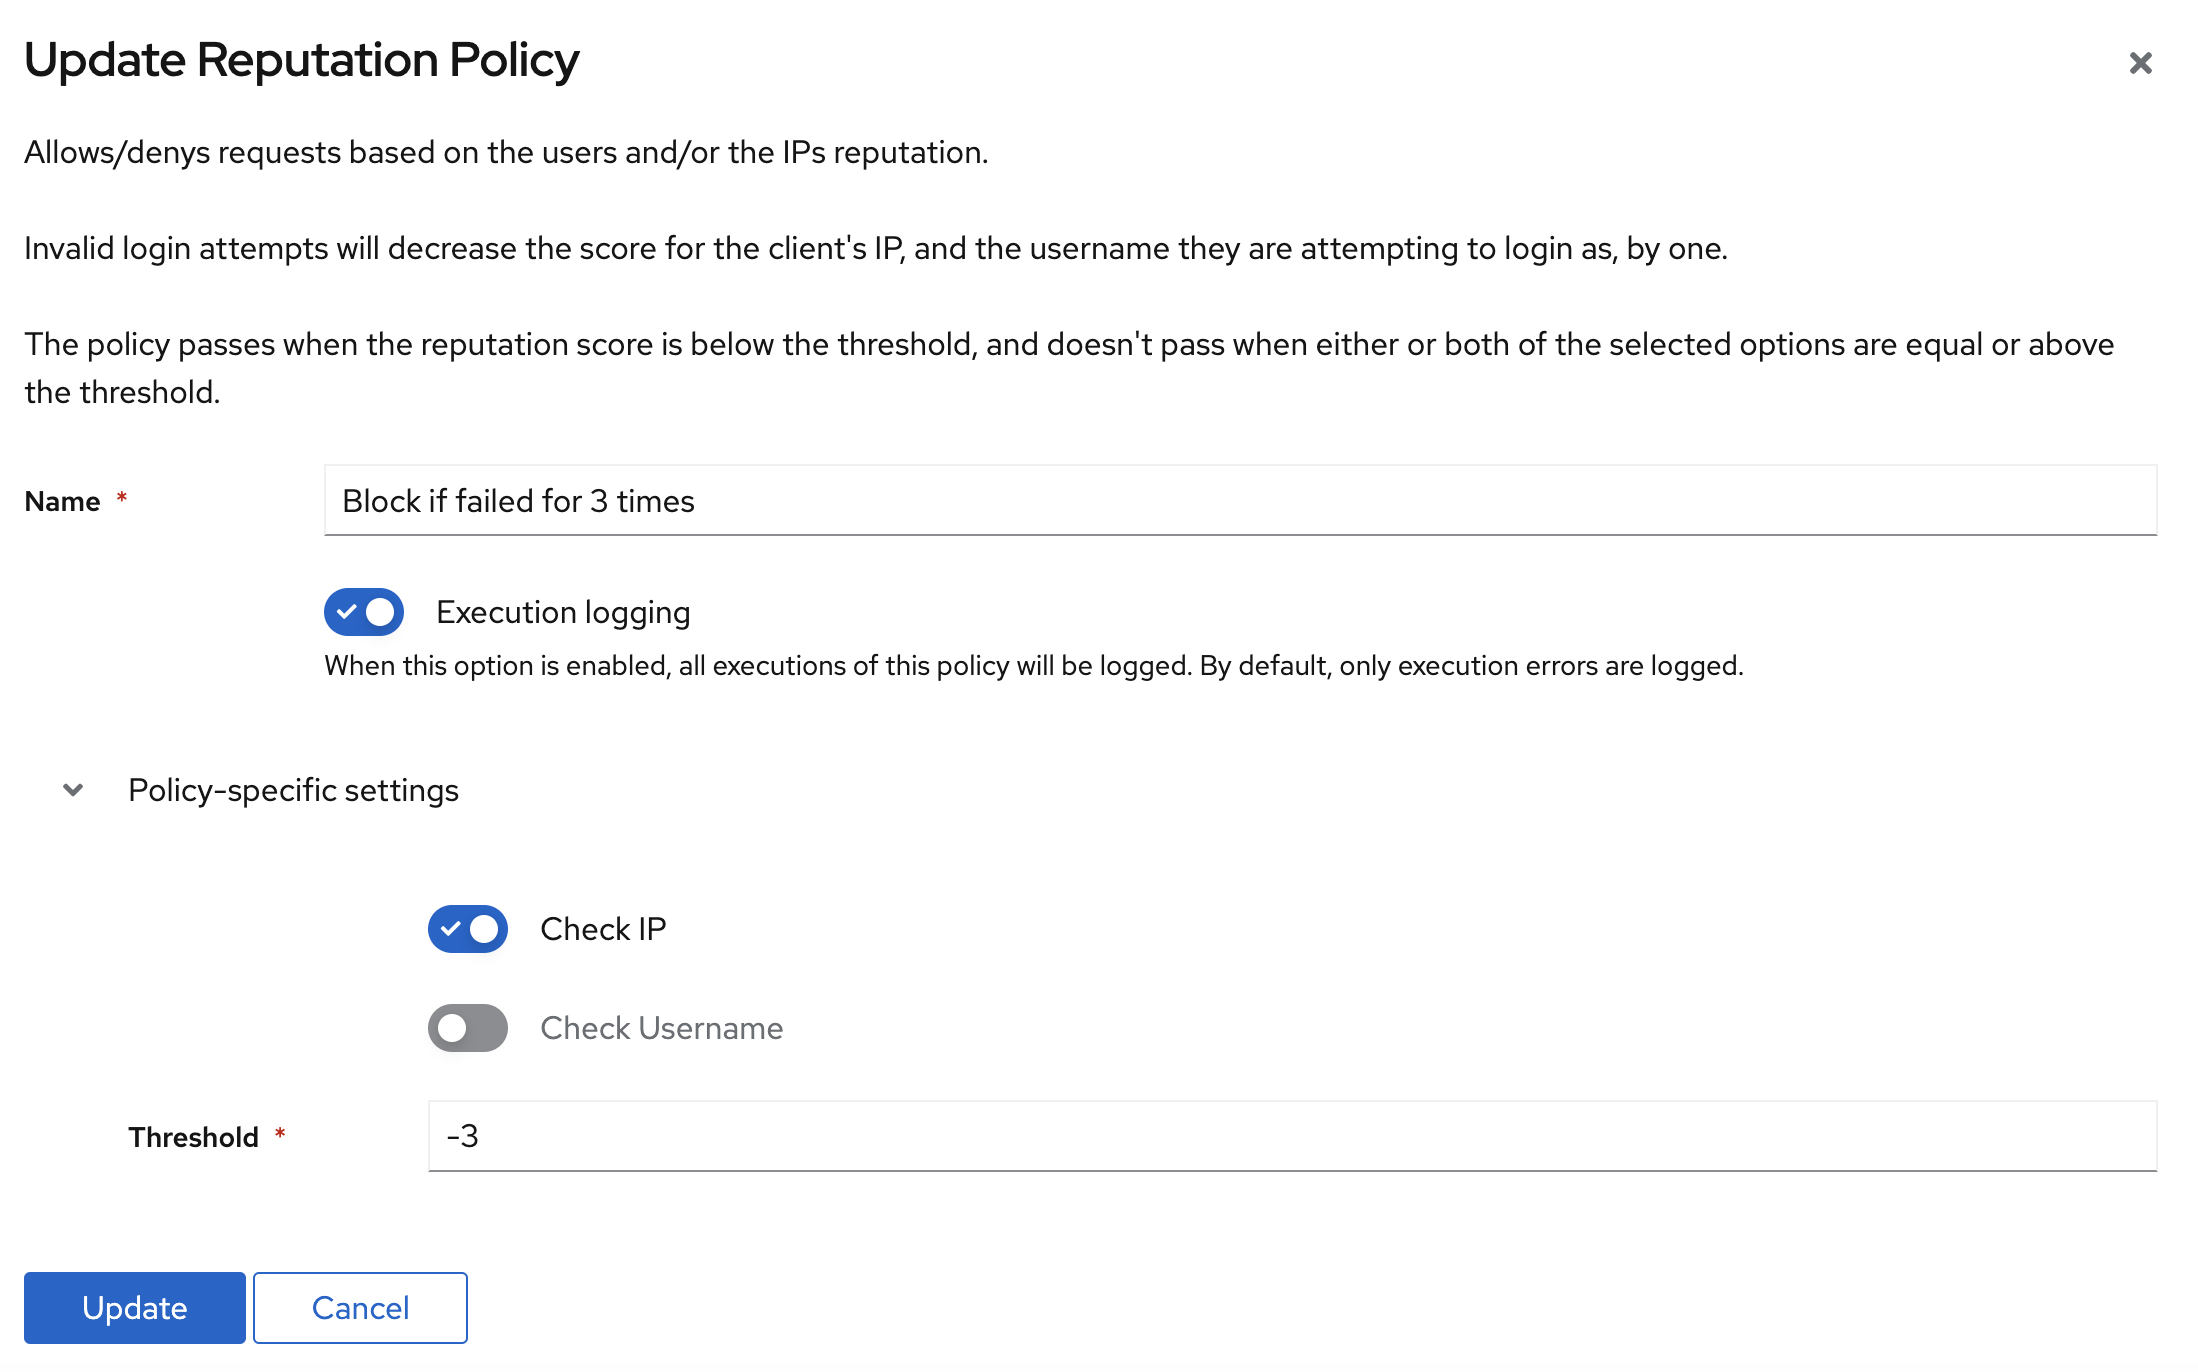
Apply to Authentication Flow
- Go back to your authentication flow →
Policy / Group / User Bindings - Click
Bind existing Group / User / Policy - Bind the reputation policy to the flow
Now if the user failed log in for 3 times, their IP will automatically be banned. This combination of CAPTCHA and login attempt limits creates a robust defense against both automated and manual attack attempts.
Integrating with Services
While Authentik supports many integration types (see their complete integration guide), I mainly use two methods: OAuth2 and Proxy authentication. Let me share my experience with both.
OAuth2 Integration
OAuth2 is perfect for services that support standard OAuth2/OpenID Connect protocols. I use this for services like GitLab, Portainer and etc..
OAuth2 basically is work like this:
        sequenceDiagram
        participant User
        participant App as Application
        participant Authentik

        Note over User,Authentik: OAuth Login Flow
        User->>App: 1. Click Login with Authentik
        App->>Authentik: 2. Redirect to Authentik login
        User->>Authentik: 3. Enter credentials
        Authentik-->>User: 4. Asks for permission
        User->>Authentik: 5. Grants permission
        Authentik->>App: 6. Sends auth code
        App->>Authentik: 7. Exchanges code for tokens
        Note right of App: 8. User is now logged in
The general set up steps are as follows:
- Go to
Applications→Create with Wizard - Set up the name and slug according to your preference, I recommend set them same as your service's name.
- In the
Providerset up page, the most important setting is theRedirect URIs/Origins (RegEx), which you can get from your app, set it correctly because it is the bridge Authentik will use to communicate with the APP - Save and note the
Client IDandClient Secret - Navigate back to your APP, fill in them also with the necessary URLs which was displaying on the Overview page of the Provider
Below are several good OAuth2 examples that you can use as reference:

Proxy Forward Auth Integration
Authentik's proxy forward feature provides a simple way to add authentication to any web application, even if it doesn't support SSO natively. Think of it as putting a security guard in front of your application.
I will use the below diagram to better illustrate how it runs:
        sequenceDiagram
          participant User as User accesses service
          participant RP as Reverse proxy
          participant Auth as authentik
          participant Service as Service

          User->>RP: Initial request
          RP->>Auth: Checks authentication

          alt User is authenticated
              Auth->>RP: Successful response
              RP->>Service: Initial request is forwarded
          else User needs to be authenticated
              Auth->>RP: Redirect to the login page
              RP->>User: Redirect is passed to enduser
          end
This method is ideal when you:
- Need quick authentication for internal tools
- Have apps without authentication
- Want centralized access control
- Don't need deep application integration
To keep this post concise, I won’t go into too much detail, as the setup process is straightforward. I might write a blog post mainly about how OAuth2 and Forward Auth work in the future, but for now, you can refer to the official documentation and examples below for guidance:
Conclusion
After using Authentik for years to secure my services, I can confidently say it was the right choice for my needs.
The learning curve was worth it. What started as a solution for managing multiple logins has become an essential part of my infrastructure, Authentik provides the right balance of features, security, and usability.
Remember: Good security doesn't have to be complicated. Authentik proves that with the right tools, you can have both convenience and protection.
If you're tired of managing multiple authentication systems or looking to improve your security setup, give Authentik a try. The community is helpful, the documentation is solid, and the system just works.





Discussion