In my previous post, I discussed security measures for my Ghost blog and promised a separate article on CDN (Content Delivery Network) integration. If you're interested in learning about my security strategy, you can find it here:
Integrating a CDN with your blog can dramatically improve your website's loading speed. While it requires some additional configuration, the performance improvement is well worth the effort. In this post, I'll walk you through how I integrated Bunny CDN with my Ghost blog.
Why Choose Bunny Instead of Cloudflare?
When I first bought my domain, Cloudflare was my immediate choice for CDN services. Their one-click setup was irresistible - no complex configurations, just enable proxying and you're good to go. This simplicity made Cloudflare the perfect starting point for my website optimization journey.
However, as I delved deeper into performance monitoring, I noticed some concerning patterns. Cache hits were disappointingly rare, with status frequently showing MISS or BYPASS. More worryingly, friends in the APAC region reported that my website actually felt slower through Cloudflare's proxy.
This led me to investigate alternative solutions, and I discovered something interesting about Cloudflare's free tier. While Cloudflare boasts an impressive network of 250+ Points of Presence (PoPs), free tier users aren't always routed to the nearest one. Instead, Cloudflare prioritizes cost efficiency over speed for these plans.
My research led me to BunnyCDN, which despite having fewer PoPs (100+ compared to Cloudflare's 250+), delivered surprisingly better performance. After I integrate my blog to Bunny, I found that the sheer number of PoPs doesn't always correlate with better speed. What matters more is the cache hit ratio - a metric where BunnyCDN significantly outperformed Cloudflare in my case, achieving around 70% compared to Cloudflare's mere 30%.
After weighing the options, I made the switch to BunnyCDN and haven't looked back. Let me walk you through the specific configuration settings I used to maximize both performance and security for my Ghost blog - these tweaks made a significant difference in my site's performance.
Overview: How It Works?
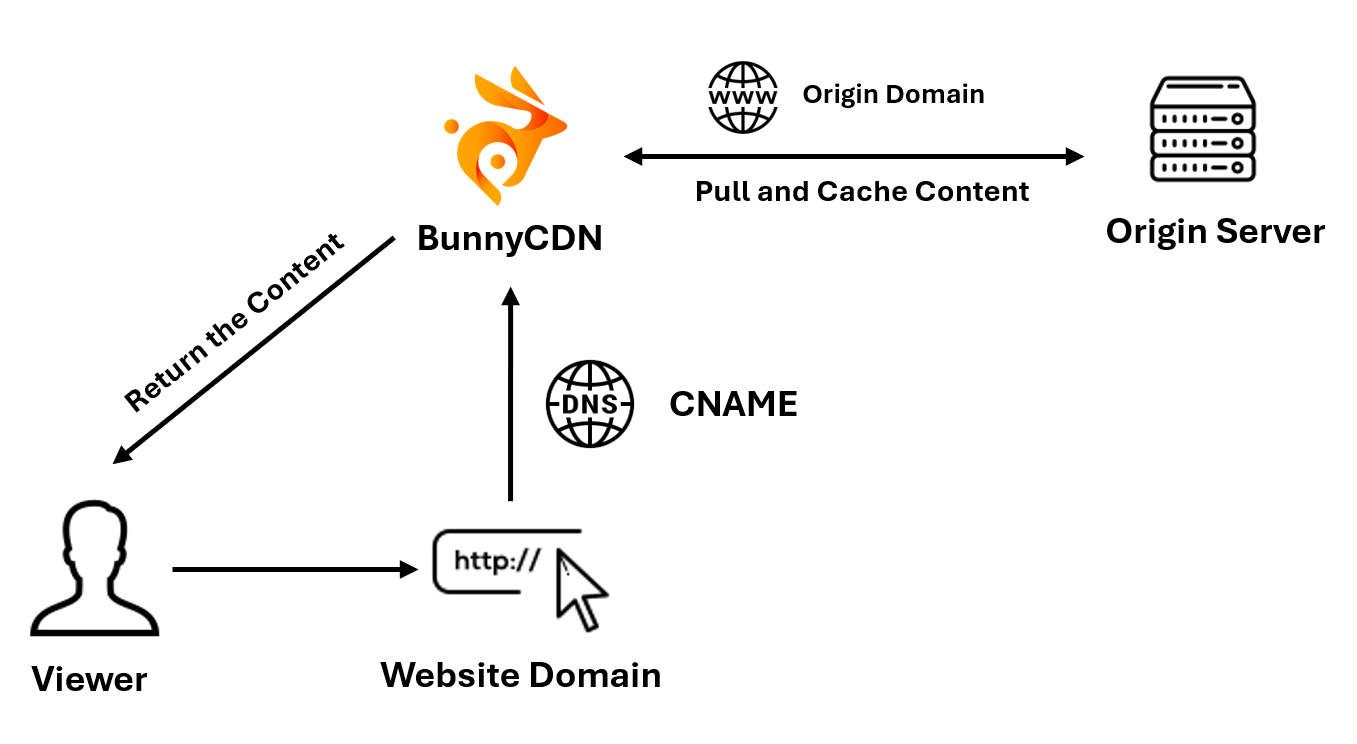
To set up BunnyCDN, you'll need three main components:
- A BunnyCDN Pull Zone;
- Your website domain (e.g.
yourdomain.com); - A CDN source domain (e.g.
cdnsource.yourdomain.com).
The Pull Zone comes with an automatically generated default domain from Bunny, and you'll need to add your website domain as a secondary hostname within this Pull Zone.
In your DNS provider, you need to set a CNAME record, to point your website domain (yourdomain.com) to BunnyCDN's default domain (e.g. pullzone.b-cdn.net), so that your website can be connected to the BunnyCDN.
Additionally, you'll need to create a separate CDN source domain (for example, cdn-source.yourdomain.com). Set this up as an A record in your DNS provider, pointing directly to your origin server. This source domain allows BunnyCDN to locate, pull, and cache content from your original website.
To help you better understand, I drew a simple flowchart as below:
Set Up Process
1. Create a Pull Zone
Visit the BunnyCDN dashboard at https://dash.bunny.net/cdn and click the "Add Pull Zone" button in the top right corner. Create a new Pull Zone with your preferred name, and set the origin URL to your CDN source domain (e.g., cdnorigin.yourdomain.example).

Select your desired Pricing Zones based on your target audience and budget. Choose specific regions where your website needs to serve content, or enable all zones for worldwide acceleration if budget isn't a constraint.
2. Create a Storage Zone and Link to the Pull Zone
The reason why we need to create a storage zone is because we need to use BunnyCDN's one of the greatest feature: Perma-Cache.
BunnyCDN's Perma-Cache feature offers an advantage over traditional CDN caching. In standard CDN setups, cached content is only available at Points of Presence (PoPs) that have previously served it, and this cache gets purged if not accessed regularly. With hundreds of PoPs, cache misses occur more frequently than expected.
Perma-Cache solves this by automatically replicating and permanently storing cached content across multiple global locations. This significantly reduces latency, even when files miss the standard CDN cache.
To implement this feature, start by creating a Storage Zone at https://dash.bunny.net/storage

Name your Storage Zone according to preference and select the main storage region closest to your location. For Geo Replication settings, choose regions based on your primary audience's location or where your website receives the most traffic. If budget isn't a concern, you can select all regions for maximum global coverage.
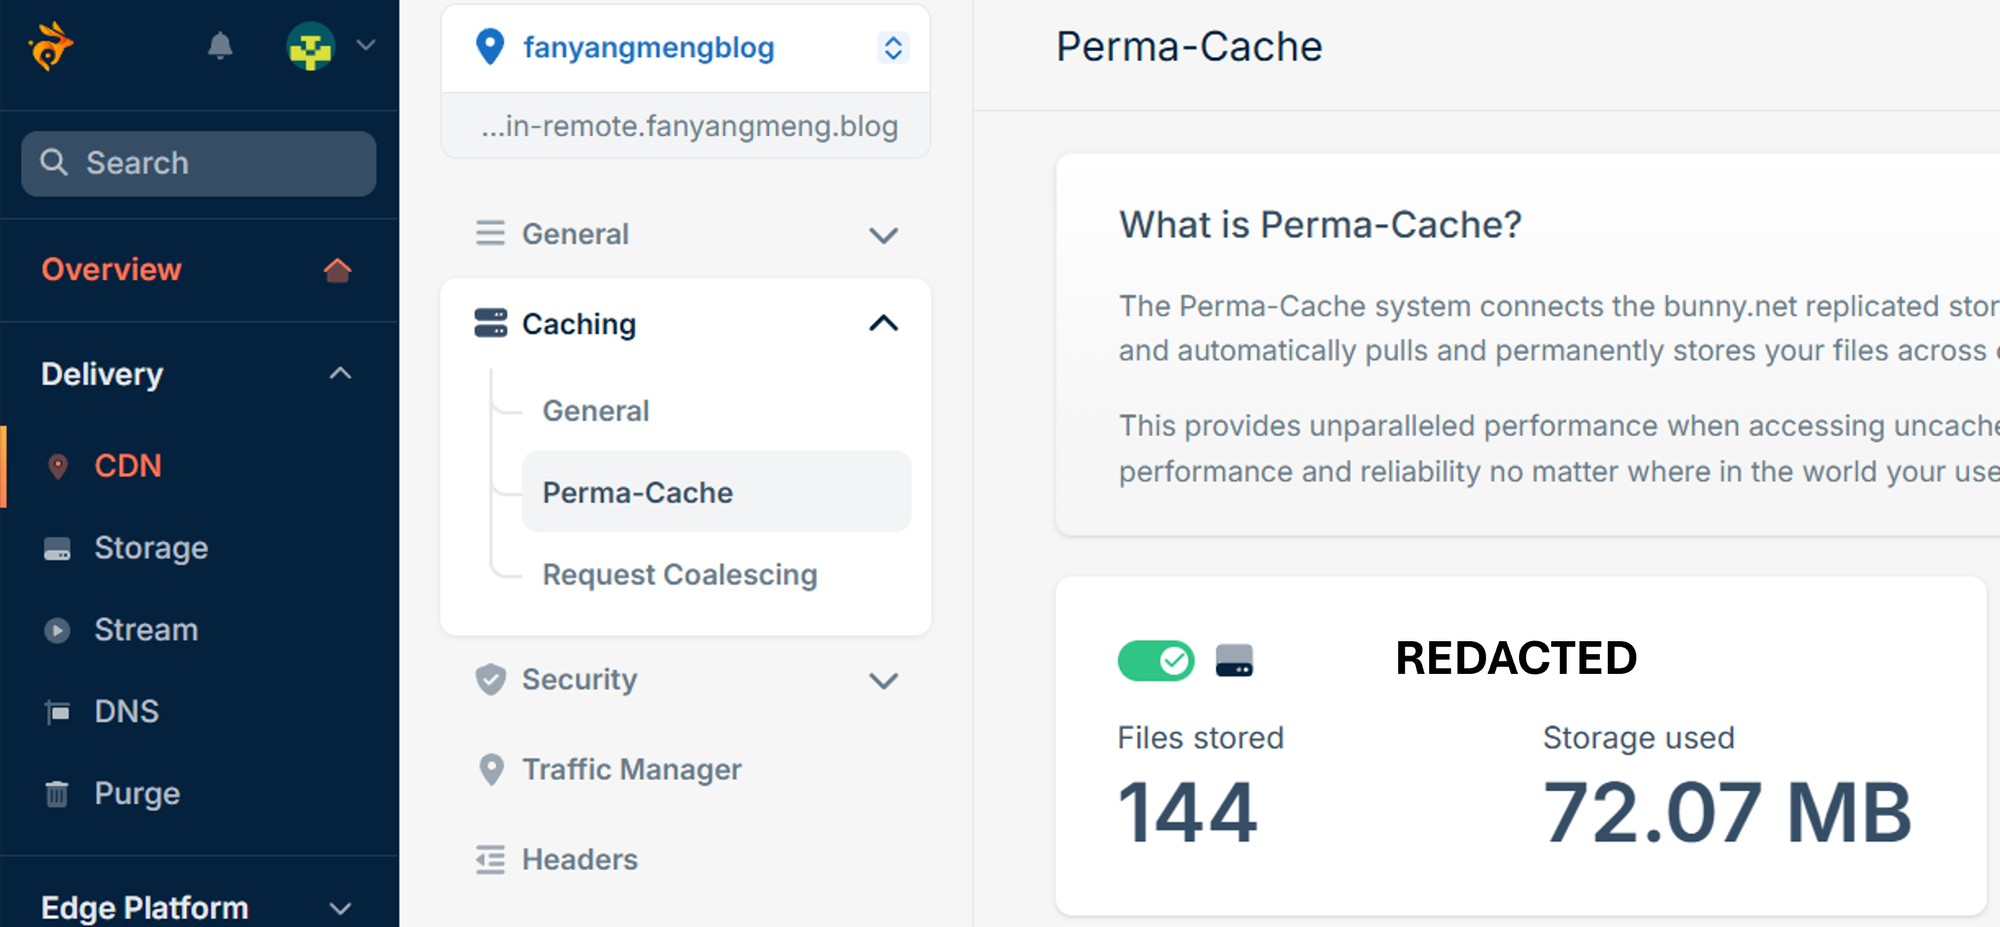
After you finish creating the Storage Zone, go back to the CDN tab and navigate to the Caching → Perma-Cache, check the storage zone you just created so that they can be linked with each other, like below:
3. Caching Configuration
Go to Caching → General, and configure the settings as follows:
- ❌ Turn OFF "Smart Cache"
Why:
Smart Cache can dynamically adjust caching behavior, but it may lead to inconsistencies if you're trying to enforce a specific caching strategy. Turning it off provides full control over caching rules.
- ⚙️ Set the browser cache expiration time to "Override: Do Not Cache"
Why:
Disabling browser caching ensures that users always fetch the latest content directly from the CDN rather than relying on potentially outdated versions stored in their browser. This is useful for dynamic or frequently updated websites.
- ✅ Turn ON "Query String Short"
Why:
This setting ensures that only essential parts of the URL query string are considered for caching, reducing unnecessary cache fragmentation caused by unimportant query parameters (e.g., tracking codes like utm_source or the order of the parameters ).
- ✅ Enable "Cache Error Response"
Why:
If multiple users—or even malicious bots—trigger error responses by sending a high volume of requests, this caching prevents those repeated requests from being sent to your origin server. Instead, Bunny.net serves the cached error response, protecting your origin from being overwhelmed by traffic.
- ⚙️ Set "Vary Cache" to "URL Query String"
Why:
This setting ensures that caching respects variations in query strings when necessary (e.g., for pages like search results or dynamic content that depend on query string parameters).
- ❌ Turn OFF "Strip Response Cookie"
Why:
When Strip Response Cookie is ON, Bunny.net removes the Set-Cookie header from the HTTP responses that your origin server sends. This effectively means any cookies your server tries to send to the browser will not be delivered to the user.
When Strip Response Cookie is OFF, Bunny.net does not remove these headers, so cookies are preserved and delivered as they were sent by your origin server.
If your website relies on cookies for any reason, stripping them would break key functionality like:
- Logging in and out.
- Persisting user preferences.
- Maintaining shopping cart or checkout data.
- ✅ Enable "While Origin Offline" and "While Updating" in Stale Cache
Why:
- While Origin Offline: Serves stale (previously cached) content when the origin server is unavailable, ensuring that your website remains operational even during outages.
- While Updating: Delivers stale content to users while simultaneously fetching a fresh version from the origin, reducing latency and improving user experience.
Edge Rules Configuration
Now we need to set up edge rules for Ghost so that we can keep all the cache to be functional correctly, there are mainly two parts we need to set in the CDN → Edge Rules tab.
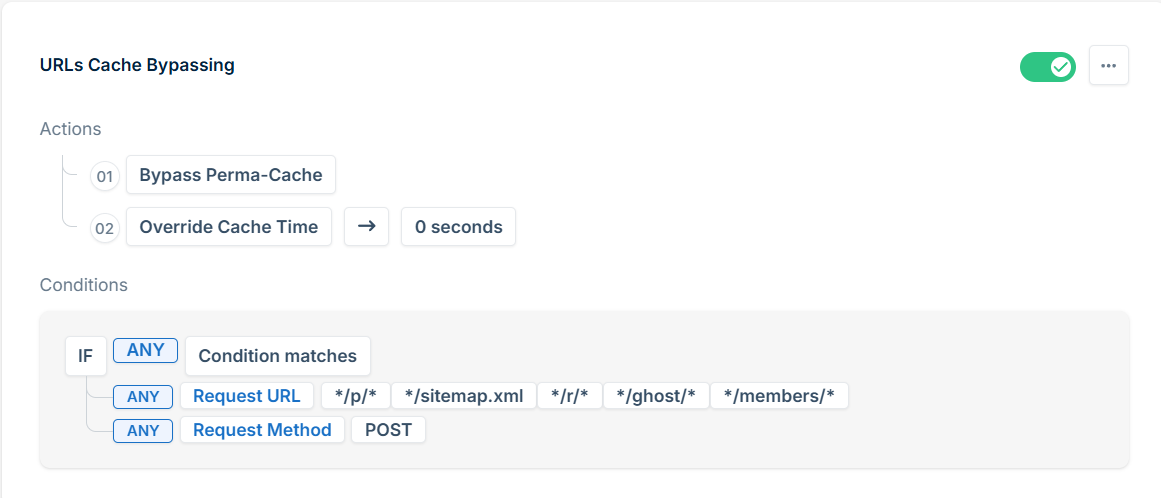
Portal, Preview and Site Necessary URLs Bypassing
Actions:
- Bypass Perma-Cache
- Override Cache Time: 0 seconds
Conditions:
IF ANY Condition Matches:
- ANY Request URL:
*/ghost/**/members/**/p/**/r/**/sitemap.xml
- ANY Request Method:
POST
ANY Request Method matches POST, it will allow you to customize your website on the admin portal Design & branding, if you do not add this rule, when you click customize button, you will see 405 Method Not Allowed on the site preview page in the pop out window! By setting cache bypass rules for these specific URLs, you:
- Enhance Security: Prevent unauthorized access to sensitive areas like the admin panel and member data.
- Maintain Functionality: Ensure dynamic and personalized content works correctly without caching interference.
- Improve SEO: Provide search engines with up-to-date sitemaps and crawling instructions for optimal indexing.
- Ensure Content Accuracy: Allow administrators and members to interact with the most recent data and site configurations.
Membership Features Cache Bypassing

Actions:
- Bypass Perma-Cache
- Override Cache Time: 0 seconds
Conditions:
- IF ALL Condition Matches:
- NONE of the following Request URLs:
*/content/**/assets/**/public/*
- OR IF ANY of the following Request Headers match:
- Set header name as
cookie
- Set header name as
*ghost-admin-api-session**ghost-members-ssr**ghost-private*
By bypassing the cache for membership features and dynamic requests, while allowing static assets to remain cached, you achieve the following:
- Security: Prevents caching of sensitive data, protecting member information and private content.
- Accuracy: Ensures real-time updates are served for admin actions and personalized content.
- Performance: Maintains optimal performance by caching only static assets, avoiding unnecessary load on the origin server.
- Privacy: Protects member-specific and private data from being cached and served incorrectly.
Performance Testing
Now we have finished all the necessary settings and configurations for BunnyCDN, let's take a look on the final performance.


The overall performance improvement is huge compare with the previous state when I was using Cloudflare. And I am super satisfied by the result.
Cache Purging Automation
While BunnyCDN's dashboard allows manual cache purging after site updates, you can automate this process. This guide shows you how to implement automatic cache purging using Cloudflare Workers.

Conclusion
By implementing these BunnyCDN configurations with Ghost, you can significantly enhance your blog's performance beyond its already solid baseline. This setup not only accelerates content delivery but also reduces the load on your origin server, potentially allowing you to operate with less expensive hosting. Most importantly, your blog will remain stable and responsive even during traffic spikes or viral moments.
In the future, I will also write a post about how I automatically purge the BunnyCDN cache whenever the Ghost blog has an update, and I will also show you the source code I have written, so stay tuned!
I hope you found this guide helpful and easy to follow. If you have any questions or need clarification, feel free to leave a comment below.


Discussion