10/27/2024 Changelog:
- Simplify the kiosk mode set up process by using Diet Pi's autostart option;
- Add link to the screen producer's official website;
- Optimized the table of content structure.
10/25/2024 Changelog:
- Add ImmichKiosk to the post, make it as the top recommendation, and add detailed instructions;
- Optimized the table of content structure.
Several months ago. I found myself pondering how to make my gift to my friend more creative and meaningful. As a software engineer, I wanted to showcase my creativity and the effort I put into the gift. Having been a self-hosting enthusiast for multiple years, I had already self-hosted my own digital album using Immich, a wonderful piece of software. It was then that an idea struck me: why not build a digital frame from scratch?
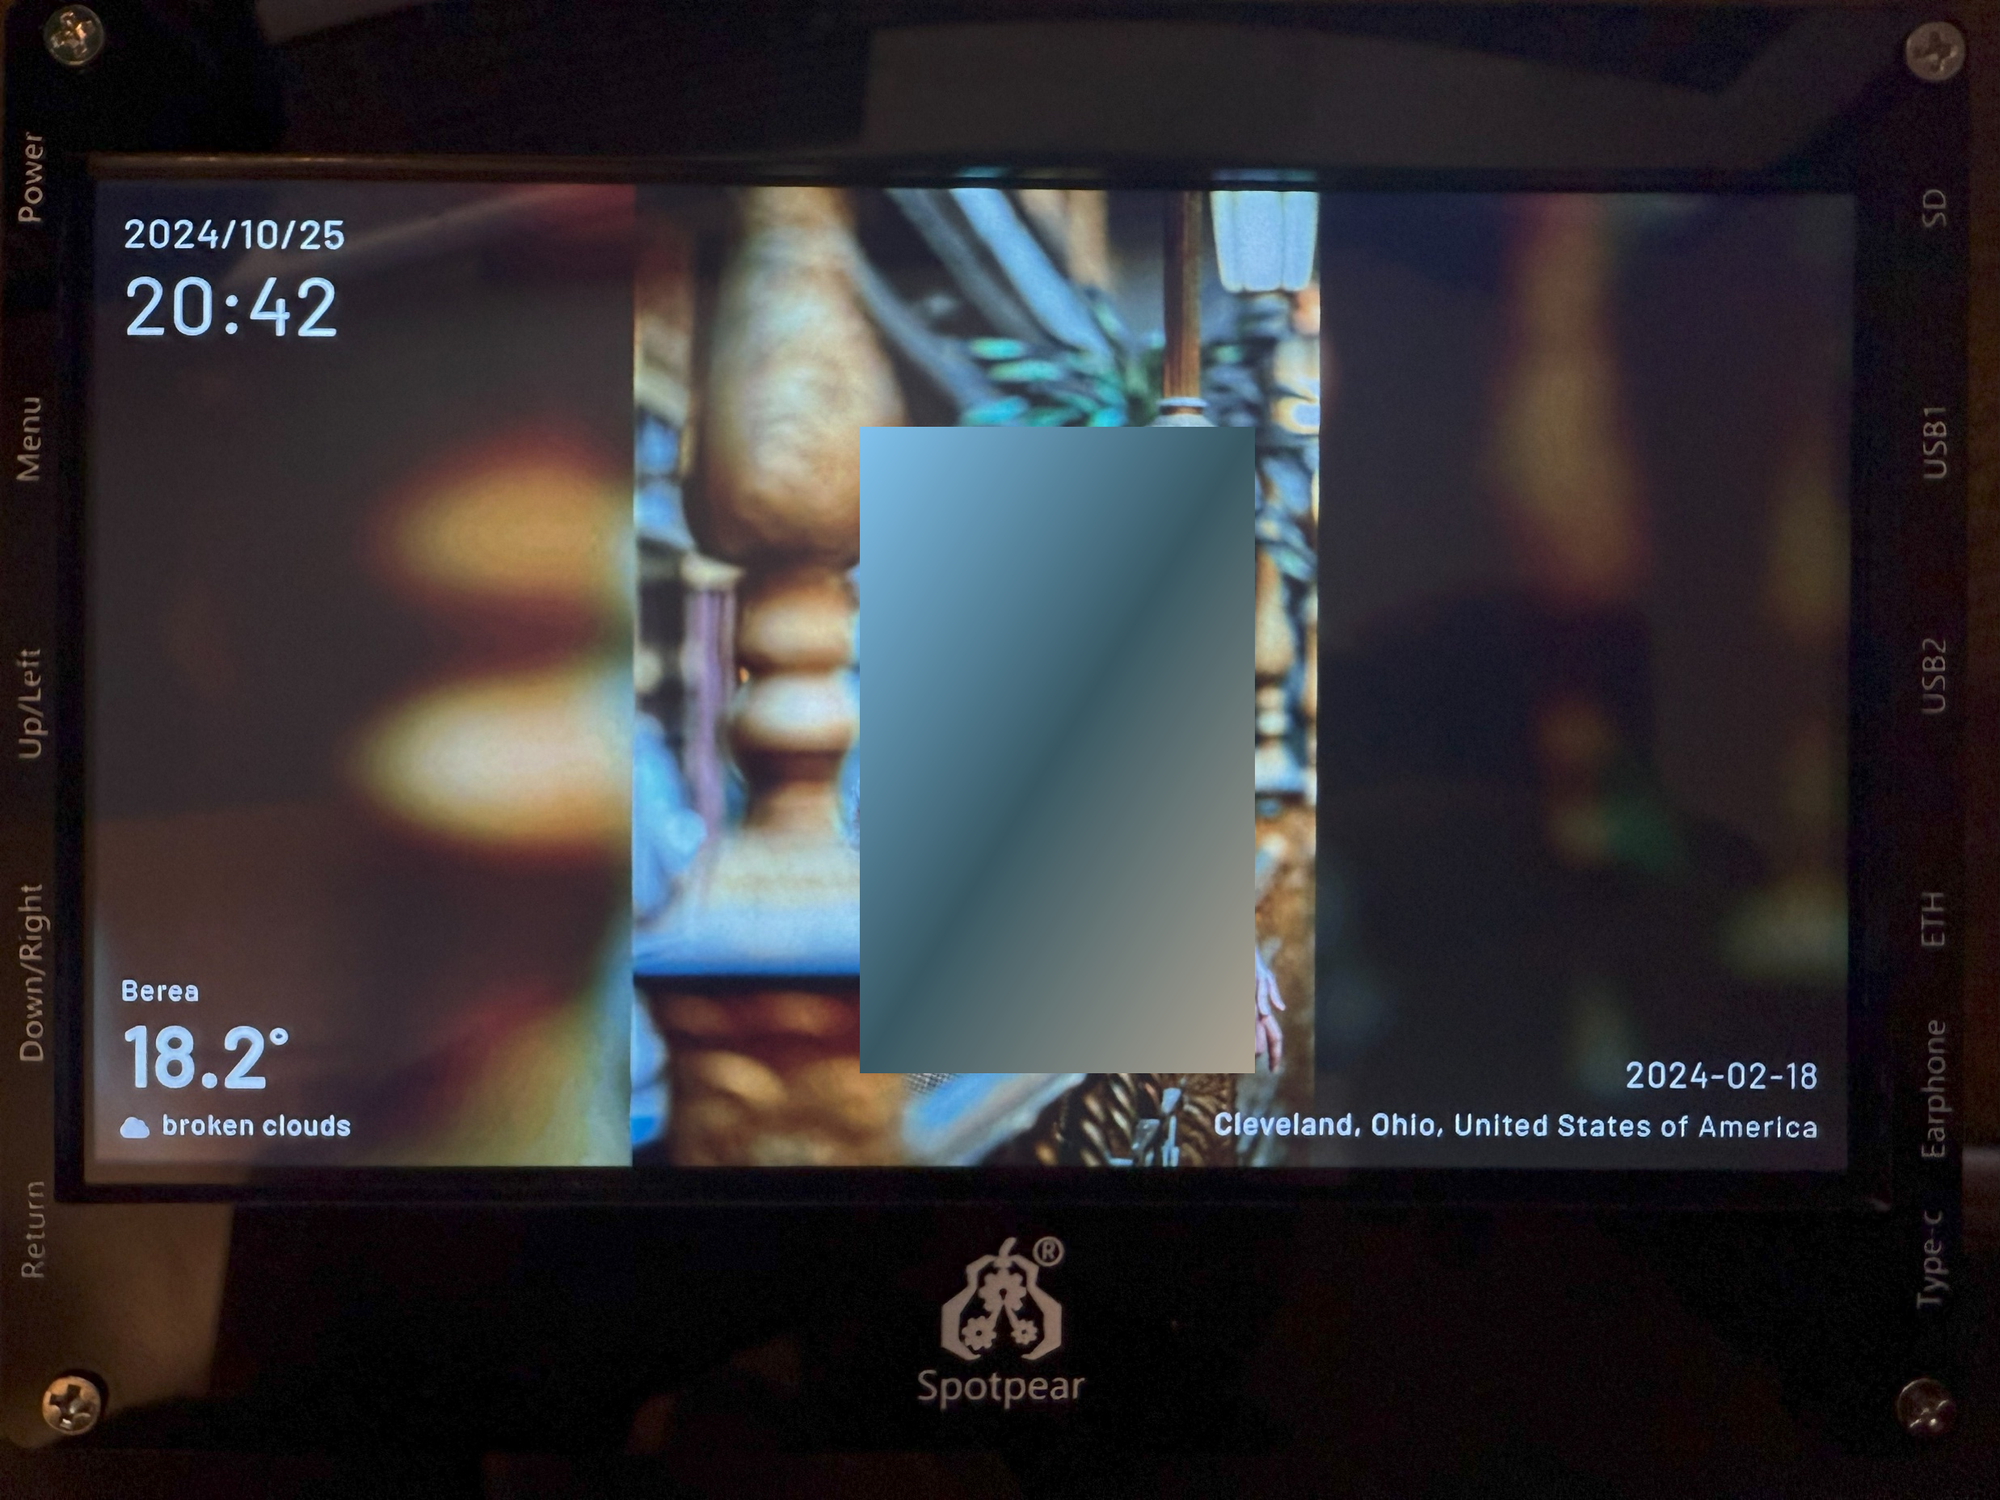
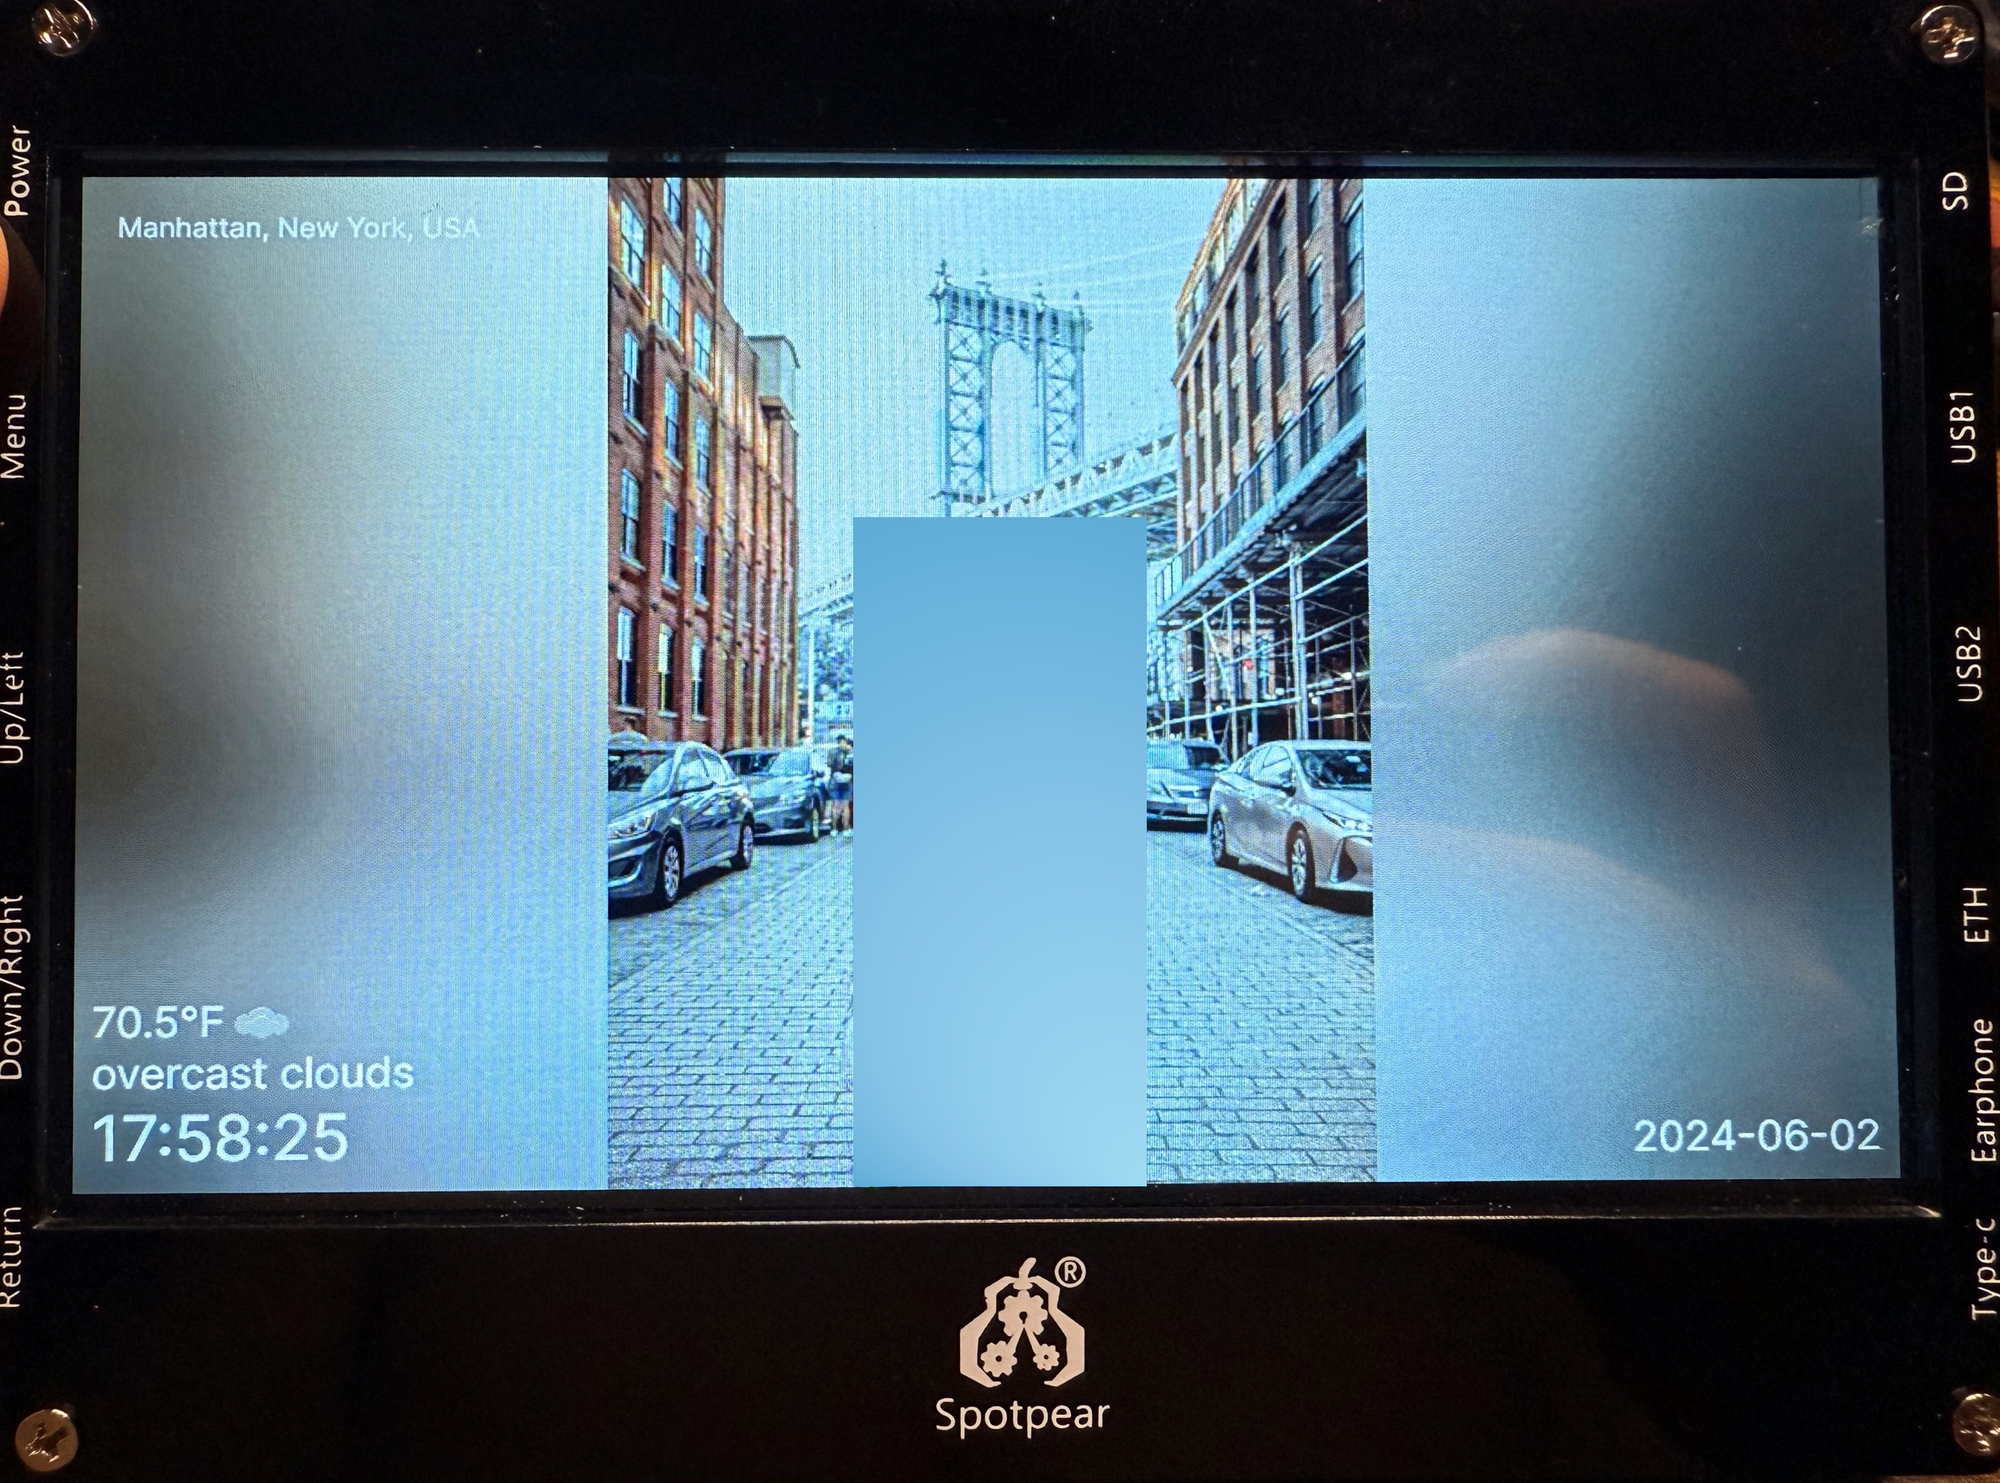
After a bit of work, I finally finished making the digital frame, and it turned out like this:

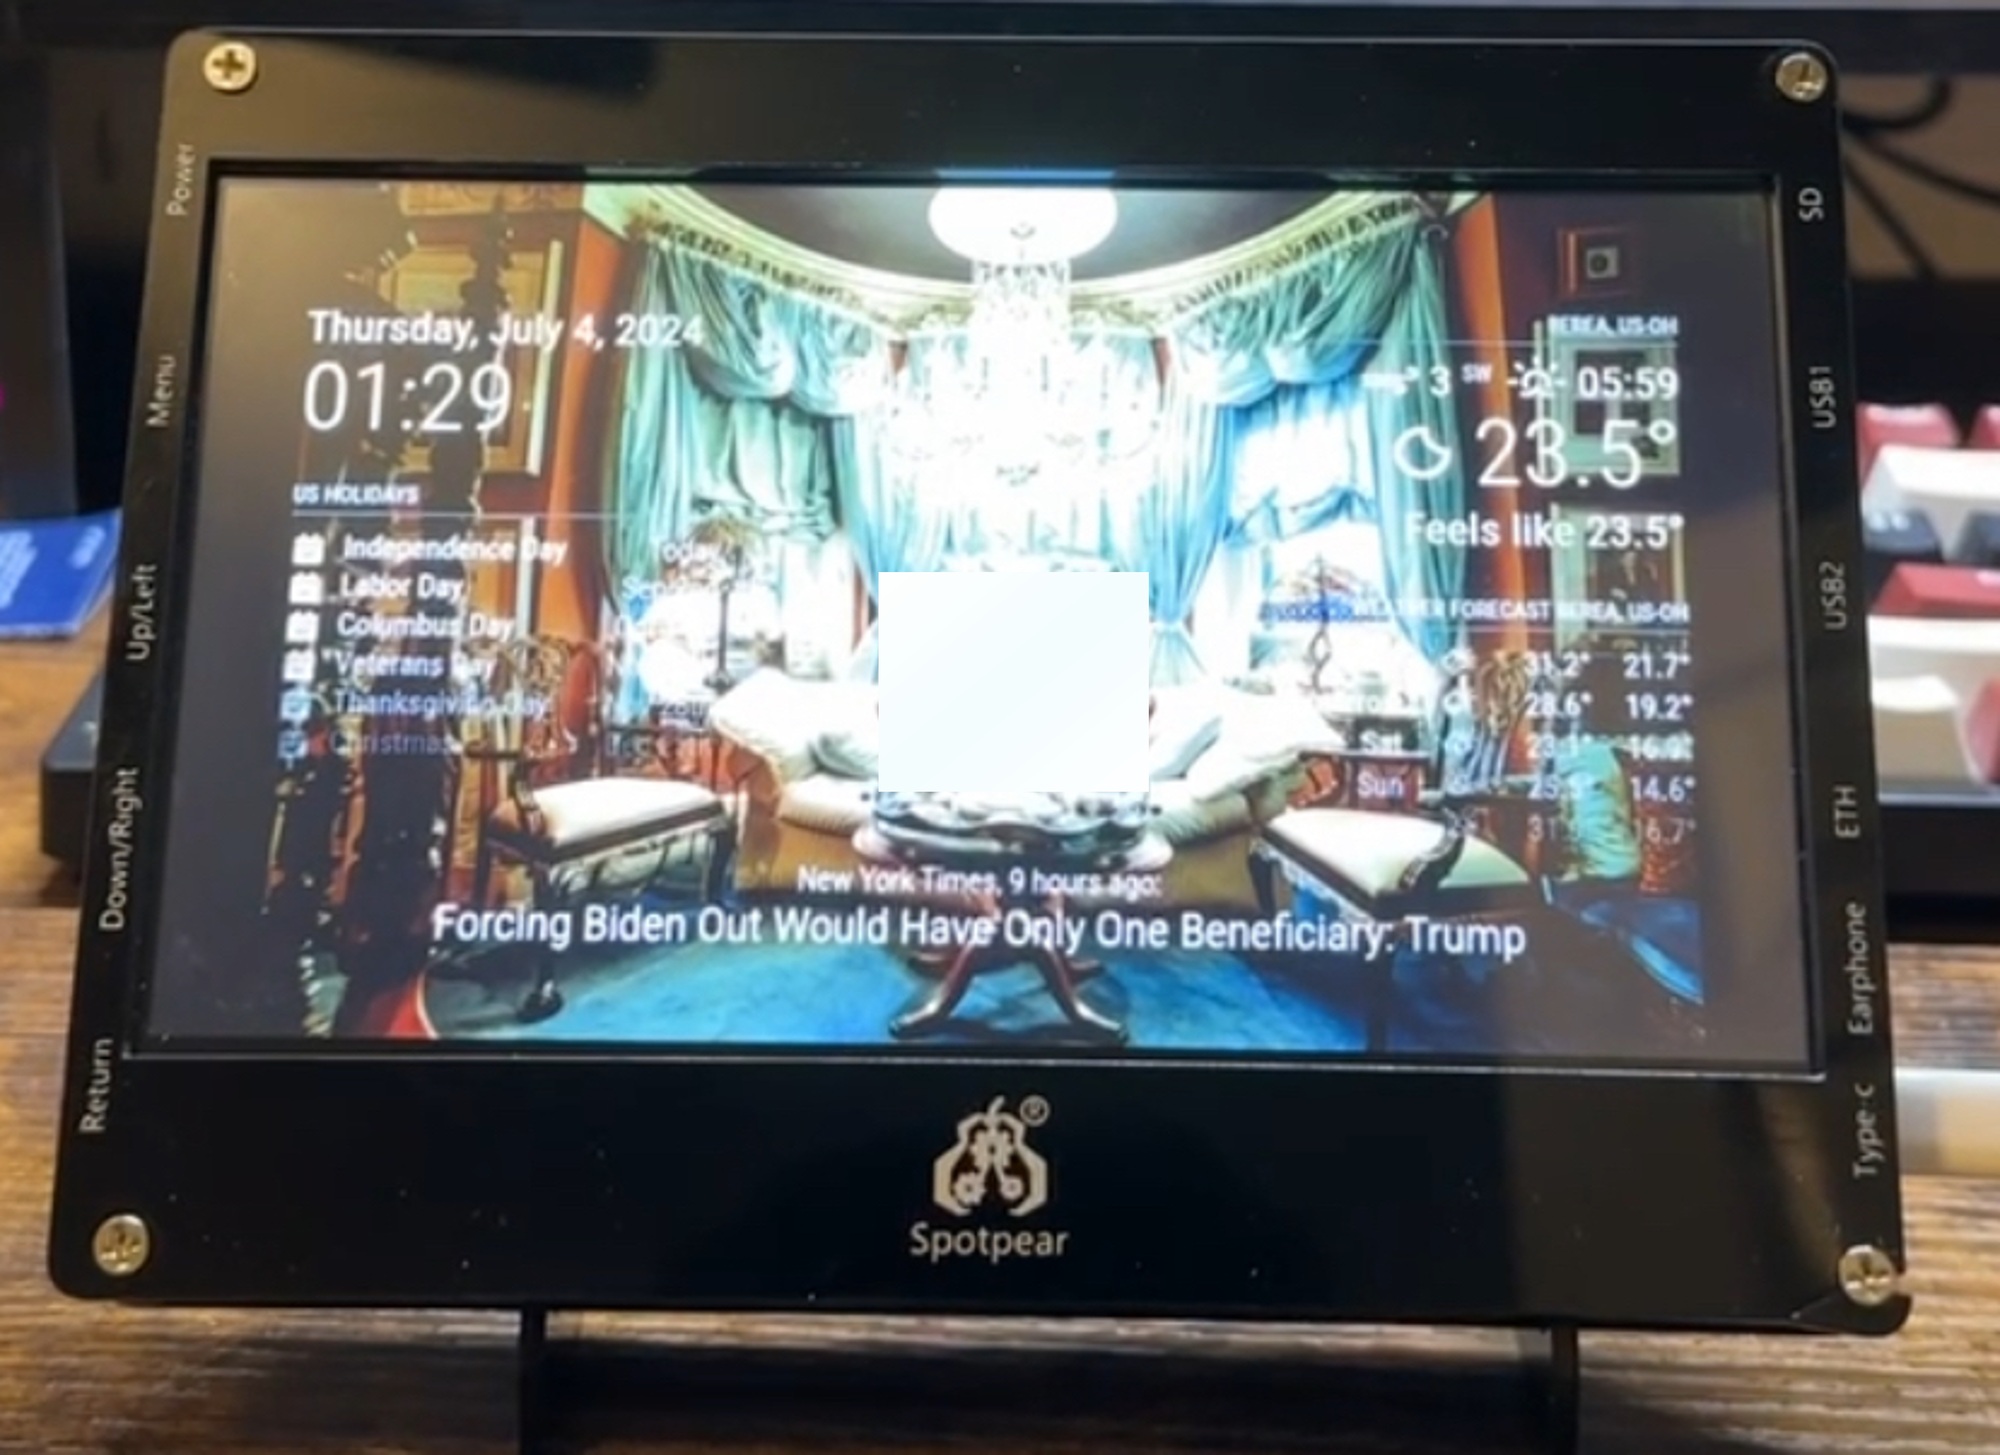
I also created another version based on ImmichFrame and MagicMirror, an open-source software, which looked like this:


After carefully using and comparing the differences between the three implementations, I ultimately chose ImmichKiosk, as it was faster and had a cleaner interface, making it more suitable for a digital frame.
The whole digital frame is based on a Raspberry Pi Zero 2 W, and the cost of it is roughly $60.
Now, I would like to share my DIY process for both implementations, so that if you want to create a similar project, you can use this as a reference.
Requirements
Hardware
- Mainboard: Buy a Raspberry Pi Zero 2 W – Raspberry Pi
- Screen: Raspberry Pi Zero 2W Customized 7inch LCD DIY Tablet Computer Touch Screen Display RJ45 USB HUB - AliExpress
- Micro SD Card: https://a.co/d/0Hmysqc
- Heatsink (for better cooling): Raspberry Pi Zero 2 W Aluminum Heat Sink Passive Cooling Radiator Metal Thermal Heat Dissipation Cooler for Raspberry Pi Zero W - AliExpress 7
Software
- OS: Diet Pi
- VPN Tunnel (Remote Management): Tailscale · Best VPN Service for Secure Networks
- Photo Album Backend: Home | Immich
- Immich Kiosk (Recommended): damongolding/immich-kiosk
- Immich Frame: immichFrame/ImmichFrame
- Node.js ( For MagicMirror): https://nodejs.org/
- MagicMirror: MagicMirror²
- ImmichSlideShow: pelaxa/MMM-ImmichSlideShow (github.com)
General Prerequisites
Diet Pi OS ( Recommended)
Official Website: https://dietpi.com/#home
Diet Pi OS is a lighter version OS compare to the Raspberry Pi OS, which can run blazingly fast on the limited machine like Raspberry Pi Zero 2 W (which is what I am using).
For the screen I am using, after you flash the OS into the SD card, you will need to add some extra lines to the config.txt in the SD card root directory to make the system can recognize the screen, according to the screen producer's website documentation, add the following lines to it:
hdmi_force_hotplug=1
config_hdmi_boost=10
hdmi_group=2
hdmi_mode=87
hdmi_cvt 1024 600 60 6 0 0 0
After this, insert the SD card to the machine, and begin the installation.
Tailscale (VPN Tunnel for Remote Management)
Tailscale is a VPN service that makes the devices and applications you own accessible anywhere in the world, securely and effortlessly. It enables encrypted point-to-point connections using the open source WireGuard protocol, which means only devices on your private network can communicate with each other.
Installing Tailscale on the digital frame can let me securely connect to the digital frame and manage it.
You can easily install it by running this command:
curl -fsSL https://tailscale.com/install.sh | shAfter the installation, make the machine join to the tailnet
sudo tailscale upImmich
GitHub: https://github.com/immich-app/immich
Immich is a high-performance, self-hosted photo and video management solution, often regarded as the best alternative to Google Photos. While Immich offers numerous advantages, I will not delve too deeply into its features since this blog post focuses on the digital frame project. However, it is worth noting that Immich is an excellent choice for those seeking a self-hosted photo album solution, offering a perfect balance of functionality and user experience.
For the installation, this will require you to have a separate server, you can choose to install it on your home server if you had one, or you can also simply rent a VPS on any provider with a public IPv4 and install on there. Simply follow the official tutorial as below:

After the installation, you will need to create an API key for later use, so that the digital frame software can access the photos in Immich without issues.
To get an API key, simply follow these steps:
- Login to your Immich instance
- Click on your username in the top right cornder
- Select
Account Settings. - Expand the
API Keyssection. - Click
New API Keyto create a new API. - Copy and save the API key somewhere to use later.
Three Implementations
ImmichKiosk (Recommended)
GitHub: damongolding/immich-kiosk
This is my go to option eventually after compare to the three of them, and if you choose to follow with my recommendation, you are safe to ignore the afterwards ImmichFrame and MagicMirror installation, as they are not seperated.
Installation & Configuration
I choose to install the ImmichKiosk on my own Raspberry Pi with Chromium Browser, this combination can run smoothly on Diet Pi OS, however if you want to run them on Raspberry Pi, please do not, as it will be super laggy.
Simple follow the binary installation in the README.md:
- Download the latest release for Linux ARM 64;
- Create config dir and download
config.yamlfile;
mkdir ./config
wget -O ./config/config.yaml https://github.com/damongolding/immich-kiosk/blob/main/config.example.yaml- Modify
config.yamlfile. Only theimmich_urlandimmich_api_keyare required fields, you can set others by following the documentation in the README; - Start Kiosk by running
./immich-kiosk.
ImmichFrame
GitHub: immichFrame/ImmichFrame
For people who want a faster and cleaner interface, you can follow this section and skip the later MagicMirror part.
Installation
Simply download the linux arm64 release and decompress it, there will be a binary file which is Immich_Frame and a Settings.example.json file, which you need to copy and rename it to Settings.json for later edit.
Make sure after decompression, run chmod +x ./Immich_Frame so that the binary file is executable.
Configuration
Reference: README.md
The two most important required settings are ImmichServerUrl and ApiKey.
For ImmichServerUrl, if you installed Tailscale as mentioned above, you can simply use your Immich server's http://[your_tilscales_machine_ip_address]:[immich_port] as the server URL. Or if you exposed the Immich to the public internet (which I strongly suggest not to do so for security reasons if you do not know how to secure it), you can use your public domain or IP address on it.
For ApiKey, we already got that, so you can simply paste it in the double quote.
I also set some other optional configurations, like WeatherApiKey etc, those are optional so you can read the doc and decide by yourself.
MagicMirror + ImmichSlideShow
If you are using a more powerful device than the Raspberry Pi Zero 2 W, you may opt for this implementation and skip the previous section. Keep in mind that this implementation requires more resources to run smoothly and offers a more sophisticated interface compared to the first implementation. However, if your hardware can handle the increased resource demands, this implementation provides a more feature-rich and visually appealing experience for your digital frame project.
Node.js
Node.js is the prerequisite framework to run the MagicMirror.
Install Node.js is pretty easy, just follow the below official guide:
# installs nvm (Node Version Manager)
curl -o- https://raw.githubusercontent.com/nvm-sh/nvm/v0.40.0/install.sh | bash

# download and install Node.js (you may need to restart the terminal)
nvm install 20

# verifies the right Node.js version is in the environment
node -v # should print `v20.17.0`

# verifies the right npm version is in the environment
npm -v # should print `10.8.2`
MagicMirror
Official website: https://magicmirror.builders/
The open source modular smart mirror platform.
Installation
- Download and install the latest Node.js version, see the official documentation:
- check if
gitis installed on your machine by executinggit(should show usage), otherwise install it - Clone the repository:
git clone https://github.com/MagicMirrorOrg/MagicMirror - Enter the repository:
cd MagicMirror/ - Install the application:
npm run install-mm - Make a copy of the config sample file:
cp config/config.js.sample config/config.js
Configuration
Adjust the ~/MagicMirror/config/config.js a bit
- Change
addressin config to0.0.0.0 - Add your own tailscale IP address or public IP address/range to the
ipWhiteList; - Remove the
complimentsin the modules (optional); - Change the weather location in both
weathermodules to your own latitude and longitude. - Add the CSS code to
~/MagicMirror/css/custom.cssto make the text clearer:
.normal,
.dimmed,
header,
body {
    color: #fff;
}
MMM-ImmichSlideShow
GitHub: https://github.com/pelaxa/MMM-ImmichSlideShow
The MMM-ImmichSlideShow module is designed to display images fullscreen, one at a time on a fixed interval, from Immich. These images can be shown in order or at random. The images can transition from one to the other and be shown with no edge (cover) or the entire image (contain). The configuration is also mostly matching MMM-Background.
Installation
cd ~/MagicMirror/modules
git clone https://github.com/pelaxa/MMM-ImmichSlideShow
cd MMM-ImmichSlideShow
npm install
Configuration
Add the module to the modules array in the ~/MagicMirror/config/config.js file:
{
    module: "MMM-ImmichSlideShow",
    position: "fullscreen_below",
    config: {
        apiKey: "{YOUR_IMMICH_API_KEY}",
        immichUrl: ""{YOUR_IMMICH_URL}",",
        immichTimeout: 15000,
        mode: "album",
        albumId: "{YOUR_IMMICH_ALBUM_ID}",
        backgroundSize: "contain",
        transitionImages: true,
        transitions: ["opacity"],
    },
},
Chromium Browser
Simply run dietpi-software and search Chromium and install it.
Kiosk Mode Set up
Setting up kiosk mode on Diet Pi is extremely easy, all you need to do is run dietpi-autostart and choose option 11, which is Chromium kiosk mode, and input the URL you want to display.
And we also need to run sudo apt install unclutter to hide the cursor.
Screen Size Adjustment
If you are using the same screen I am using, we need to adjust the screen size in /boot/dietpi.txt as well, so that later when the Chromium browser starts, the screen size could be right, which is 1024x600 according to the screen producer's website.
SOFTWARE_CHROMIUM_RES_X=1024
SOFTWARE_CHROMIUM_RES_Y=600
Bash script
ImmichKiosk
If you use Diet Pi's built in kiosk option as mentioned above, we need to tweak the bash script a bit, so that we can hide the cursor.
Follow the below example to adjust your script created by the Diet Pi:
/var/lib/dietpi/dietpi-software/installed/chromium-autostart.sh
#!/bin/dash
# Autostart script for kiosk mode, based on @AYapejian: https://github.com/MichaIng/DietPi/issues/1737#issue-318697621

# Resolution to use for kiosk mode, should ideally match current system resolution
RES_X=$(sed -n '/^[[:blank:]]*SOFTWARE_CHROMIUM_RES_X=/{s/^[^=]*=//p;q}' /boot/dietpi.txt)
RES_Y=$(sed -n '/^[[:blank:]]*SOFTWARE_CHROMIUM_RES_Y=/{s/^[^=]*=//p;q}' /boot/dietpi.txt)

# Create a temporary xinitrc file to launch unclutter before chromium
cat > /tmp/xinitrc.tmp << 'EOF'
#!/bin/dash
# Hide cursor
unclutter -idle 0 -root &

# Launch Chromium with provided arguments
exec "$@"
EOF
chmod +x /tmp/xinitrc.tmp

# Command line switches: https://peter.sh/experiments/chromium-command-line-switches/
# - Review and add custom flags in: /etc/chromium.d
CHROMIUM_OPTS="--kiosk --no-memcheck --window-size=${RES_X:-1280},${RES_Y:-720} --window-position=0,0"

# If you want tablet mode, uncomment the next line.
#CHROMIUM_OPTS+=' --force-tablet-mode --tablet-ui'

# Home page
URL=$(sed -n '/^[[:blank:]]*SOFTWARE_CHROMIUM_AUTOSTART_URL=/{s/^[^=]*=//p;q}' /boot/dietpi.txt)

# RPi or Debian Chromium package
FP_CHROMIUM=$(command -v chromium-browser)
[ "$FP_CHROMIUM" ] || FP_CHROMIUM=$(command -v chromium)

# Use "startx" as non-root user to get required permissions via systemd-logind
STARTX='xinit'
[ "$USER" = 'root' ] || STARTX='startx'

exec "$STARTX" /tmp/xinitrc.tmp "$FP_CHROMIUM" $CHROMIUM_OPTS "${URL:-https://dietpi.com/}"
ImmichFrame
We need to choose Custom script (foreground, with autologin) in dietpi-autostart menu, and set the kiosk mode as follows.
#!/bin/bash
xset -dpms
xset s off
xset s noblank

unclutter -idle 0.5 -root &
/home/{your_user}/ImmichFrame-v1.0.15.0-linux-arm64/Immich_Frame
System Service
ImmichKiosk
Create a system service at /etc/systemd/system/immich-kiosk.service
[Unit]
Description=Immich Kiosk
After=network.target
StartLimitIntervalSec=0

[Service]
Type=simple
Restart=always
RestartSec=1
User={your_user}
WorkingDirectory=/home/{your_user}     # Add this line (adjust path to where your config.yaml is)
ExecStart=/home/{your_user}/immich-kiosk
Environment=HOME=/home/{your_user}     # Add this line to ensure proper home directory resolution

[Install]
WantedBy=multi-user.target
Run the below command to start and enable the service
sudo systemctl start immich-kiosk
sudo systemctl enable immich-kiosk
MagicMirror
Create a system service at /etc/systemd/system/magicmirror.service
[Unit]
Description=MagicMirror
After=network.target
StartLimitIntervalSec=0

[Service]
Type=simple
Restart=always
RestartSec=1
User={your_user}
WorkingDirectory=/home/{your_user}/MagicMirror/
ExecStart=/home/{your_user}/.nvm/versions/node/v20.16.0/bin/node serveronly

[Install]
WantedBy=multi-user.target
Run the below command to start and enable the service
sudo systemctl start magicmirror.service
sudo systemctl enable magicmirror.service
Conclusion
Thank you for reading this far, and congratulations on successfully reproducing or creating a similar project using this post as a reference! While there are many small details that I did not include in this blog post, rest assured that they won't significantly influence the overall setup process. This blog post is already quite comprehensive and includes the necessary knowledge for you to get your digital frame up and running.
If you managed to complete your project, I hope you feel as proud of yourself as I do. I firmly believe that there is no better gift than one in which you invest your time, effort, and even a little bit of blood (yes, I scratched myself while assembling the screen). Thankfully, my friend loved the digital frame so much, and I'm sure your loved ones will appreciate the thoughtfulness and dedication you put into creating this special gift.
I hope you found this guide helpful and that it has inspired you to create a meaningful gift for the special people in your life. May your digital frame project bring joy and strengthen your relationships with those you care about most!


Discussion